How To
Backup, Erase, Reformat and Install a New OSX on a Hard Drive
1. First, BACKUP the data
on your HD (if it is valuable and irreplaceable) by:
-----Simply copying important folders & files to another disk such as a
USB Stick, external HD, etc.
-----Or copy the entire HD to another HD by using a cloning application such
as Carbon
Copy Cloner or
SuperDuper (free).
2. Next, insert
an OSX INSTALL DISK into your computer and reboot, holding down the C key after
the chimes.
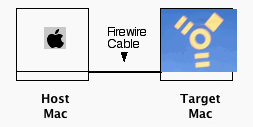
[Note: If the Install Disk is a DVD (such as 10.4 Tiger), and your computer
does not have a DVD player, you need to use another Mac with a DVD player. Shut
down your computer, connect the two machines with a Firewire Cable, hold the
T key down on your Mac to make it the 'Target', then power up. A yellow 'Firewire
Symbol' should appear after a few seconds on your target Mac and your HD should
appear on the boot up machine's desktop. Insert the Install DVD into the bootup
mac- it will restart from the DVD. Then follow the tutorial.]

3. After the computer boots up from the Install Disk and gets to the startup screen, go to Installer > Open Disk Utility.
4. REFORMAT (erase) the target HD by selecting it in the Disk Utility window, then click on the Erase tab at top.
5. Specify a Format (such as Mac OS Extended (Journaled), a Name (such as MacHD), check the box (Mac OS 9 Drivers Installed), and then click ERASE.
6. The basic erase takes only a few seconds before a new HD icon appears on the desktop. (If you prefer a more secure erasure of data, choose one of the Security Options which will take longer to complete).
7. Quit the Disk Utility.
8. Then click Continue to install the OSX and just follow the instructions. When you get to the screen showing the possible Destination Volumes available, each will be marked with a Green, Yellow or Red Triangle indicating its availability for the new OS installation.
Hammondsport Mac Users Group - Hammondsport, NY 14840 - www.hportmug.com